Meteorological environment monitoring equipment supplier
Insist on doing high-precision customer favorite technology products

Meteorological environment monitoring equipment supplier
Insist on doing high-precision customer favorite technology products

1. Product Overview
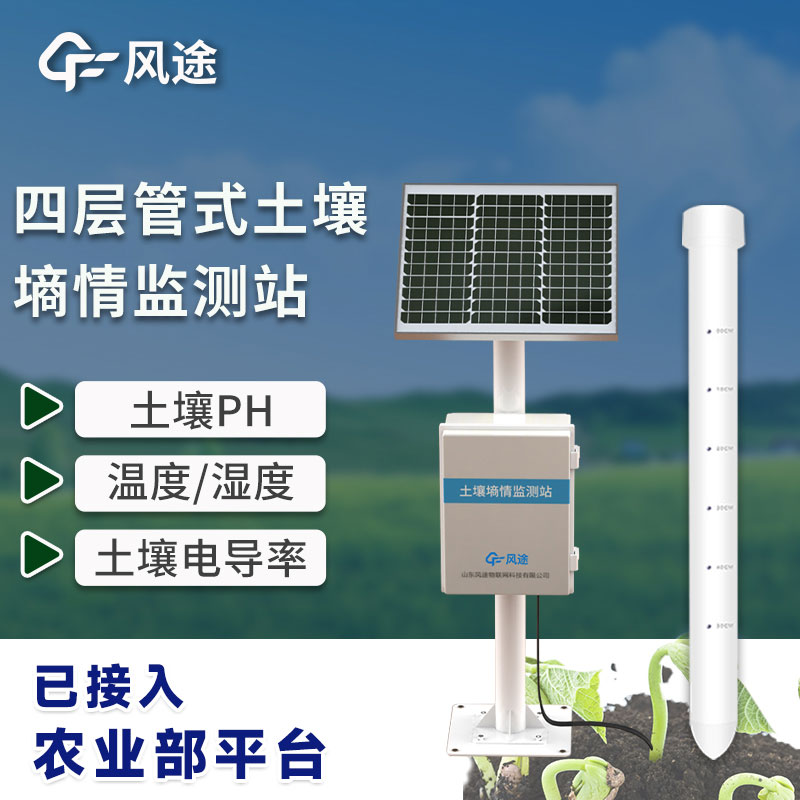
The tubular soil moisture monitor is a sensor developed based on the principle of dielectric constant, which can quickly, accurately and comprehensively monitor the moisture and temperature content of different soil layers. The number of monitoring layers of this sensor can be customized. It can measure the soil temperature and humidity of a minimum of three layers and a maximum of ten layers of soil.
This product can quickly and comprehensively understand soil moisture information, provide decision support for drought relief, and minimize disaster losses. The product uses standard Modbus-RTU485 communication, which can communicate up to 2000 meters and supports secondary development.
The products are suitable for agricultural and rural bureaus, universities, scientific research institutes, water conservancy bureaus, environmental protection bureaus, enterprises and institutions.
2. Product features
1. The outer shell is made of PVC plastic pipe, and the interior emits high-frequency detection waves of nearly 1G Hz, which can penetrate the plastic pipe and effectively sense the soil environment.
2. It is not affected by salt ions in the soil. Agricultural activities such as chemical fertilizers, pesticides, and irrigation will not affect the measurement results, and the data is accurate.
3. The electrodes of the sensor are not in direct contact with the soil to avoid electrical interference on the soil and plants in the soil.
4. The product adopts the standard Modbus-RTU485 communication mode, with a maximum communication distance of 2000 meters.
5. Supports 10-30V wide voltage charging.
6. The integrated device can monitor four layers of soil temperature and humidity at the same time.
3. Technical parameters
1. Working temperature: -40℃-80℃
2. Soil moisture: 0~100% (±5%)
3. Soil temperature: -15℃~35℃ (±0.5℃)
4. Measuring point spacing: 10cm
5. Power supply mode: 10-30V wide DC power supply
6. Shell: PVC plastic pipe
7. Protection level: IP68 below the ground
8. Output signal: RS485 (Modbus protocol)
9. Power consumption: 0.9W for four layers
4. Equipment installation instructions
1. Use a soil drill to drill holes at appropriate locations.
1.1 Hold the soil drill vertically on the ground, hold the handle tightly with both hands, and push down clockwise to turn it slowly. (Note: Don’t use too much force, and be sure to turn it slowly and several times to prevent the drill bit from wandering and causing the hole to become crooked)
1.2. Take out the soil auger from the hole and put it into a bucket. Collect the soil in the soil auger into the bucket for the next step and mud. (Note: Because the first drilling soil has too many impurities, it will not be collected)
1.3. Repeat the above-mentioned drilling and soil removal, and during this process, try to gently put the sensor into the hole (do not touch the device to the bottom with force) to test whether the depth of the hole is appropriate; if there is any lag, then Use a soil drill to make corrections to ensure that the sensor is put in and taken out smoothly; until the hole depth is flush with the installation position marked by the sensor, the drilling is completed.
2. Make mud
2.1 Pick out the impurities in the soil removed by the soil auger, such as stones, grass roots, and soil clods that are not easily dissolved. Grind the soil finely to mix with the mud
2.2 Pour in an appropriate amount of water and stir thoroughly until it becomes sticky; loam mud should generally not be thicker than "tahini"; complete the mud.
3. Grouting installation
3.1 Slowly pour the mud into the hole to about 1/2 of the hole; it can be increased or decreased according to the actual situation.
3.2 Slowly put the sensor into the hole, slowly turn it in one direction and press it down. If the speed is too fast, the bubbles may not be completely discharged (Note: Do not pull up the sensor while turning it down to prevent the gas from being inhaled again. hole)
3.3 When the sensor is installed to the correct depth, some mud will overflow around the equipment and grouting is completed; at this time, the sensor installation depth is flush with the hole (note: remove excess mud beyond 3CM around the sensor to prevent caking and affecting water penetration)
Sales Manager:Ms. Emily Wang
Tel, Whatsapp:+86 15898932201
Email:info@fengtutec.com
Add:No. 155 Optoelectronic Industry Accelerator, Gaoxin District, Weifang, Shandong, China


 Get a Free Quote